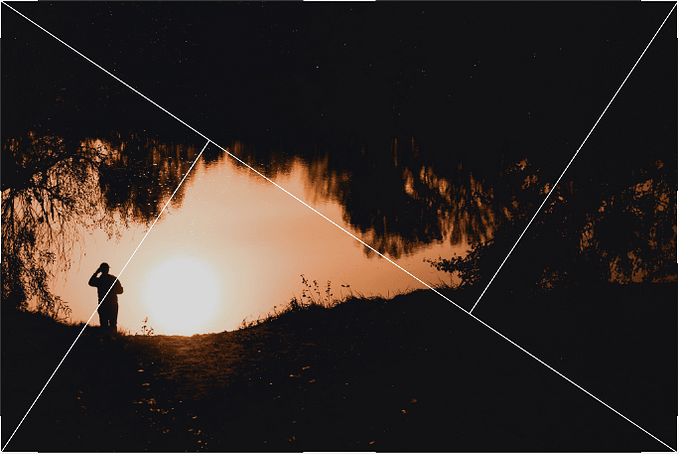
Oh Snap! A Really Short Beginner’s Guide to Photography.
Everything you need to know in 20 minutes.
Introduction
Though I usually write about advertising on here, I know we’re all suffering from overwhelming existential dread during this lockdown, and how we utilize this time decides how we come out of this. So if you’ve got a camera lying around that you’ve never bothered to use, or you just need some guidance on getting started, I’ve laid out everything here to help you hit the ground running, or, hit the bedroom with some cool subjects. And I’ve tried to condense it all down to the fewest words possible, because few have the attention span to read an entire book, or pay for one. This is free.
This guide will focus on DSLR and mirrorless cameras, the most commonly used professional cameras which offer interchangeable lenses.
The only topic I will not cover in this guide is flash — it’s important to learn the basics first, get a few techniques down, and when you’re ready to pull your hair out, you can step on Planet Flash. I will write that as a separate guide.
So let’s jump right into it.
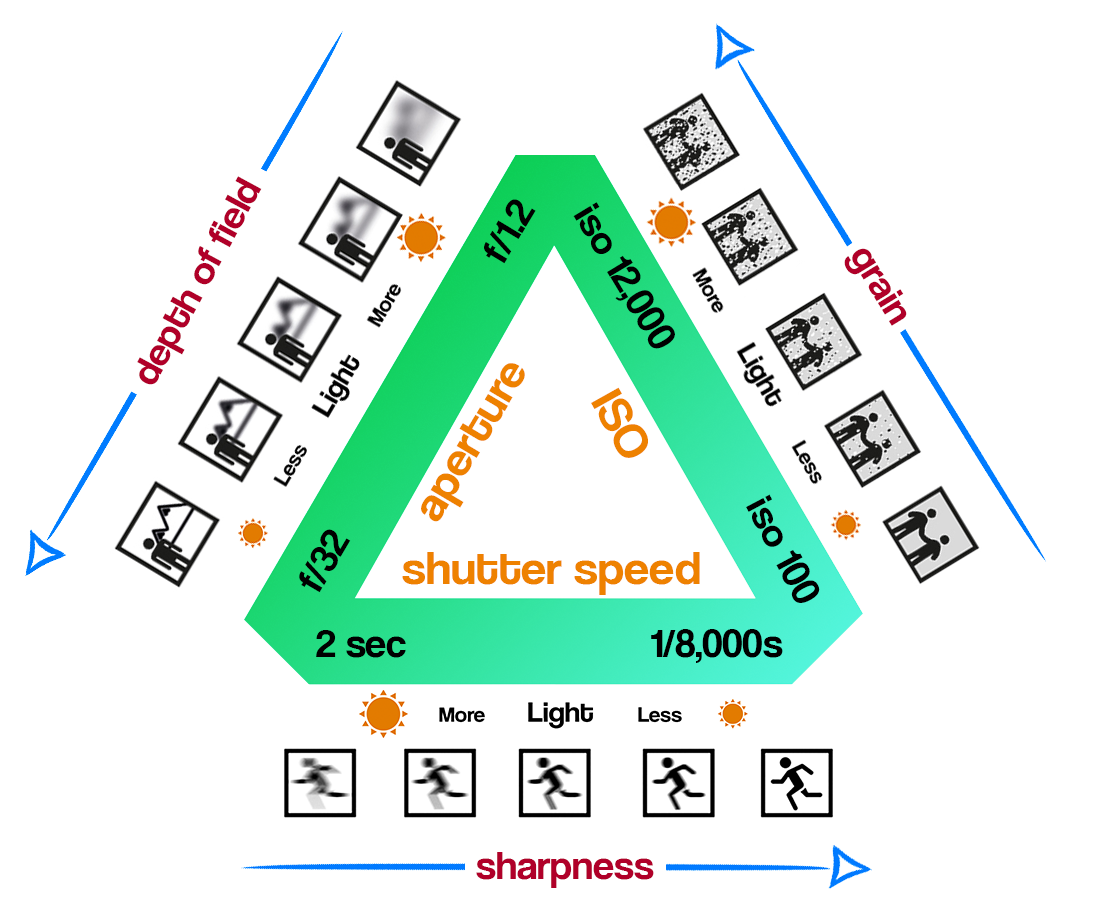
Now, you see that complicated graph-chart-math looking thing below? Don’t let it scare you—in fact, don’t worry about it too much now. After the first couple paragraphs, it will all make sense. You can come back to it later, but it’s important to have as a reference as we dive into the first three variables that make up every photograph, which are shutter speed, aperture, and ISO.
Shutter Speed
Shutter speed, also known as exposure, is the amount of time the shutter lens opens, exposing the camera’s sensor to light. Cameras determine these settings by slashes and quotations. A shutter speed of 1/125 means the lens opens for 1/125th of a second. A shutter speed of 2” means the shutter is opened for 2 seconds. The longer the shutter speed, the more light gets into the photo. The photo below was taken with three different shutter speeds, but with all other settings identical. Too much light will come out overexposed, too little light will come out underexposed.

Shutter speed can also determine if you freeze something in action, or allow the photo to show something in motion. The long-exposure shots below were taken with a slow shutter speed to show motion.

A general rule of thumb for shutter speed is that 1/100th is about as slow as you can shoot by hand. Anything slower results in blurry and shaky images, and will require a tripod.
Aperture
Aperture, also known as an f/stop, is the size of the opening inside the camera lens. Think of it like your eyeball, the aperture blades open and close to allow more or less light to hit the camera’s sensor, the way your iris adjusts to changes in light.
Aperture numbers work a little backwards from how you might think. Wide apertures are large openings, and are determined by low f-stop numbers. f/1.2 is about as wide as they get. The smaller the opening, the larger the number, so a narrow aperture such as f/22 is a tiny hole that allows for very little light. This will also affect the exposure of your image. A wide aperture will allow for more light, meaning you will need a faster shutter speed, or your photo will come out overexposed. A narrow aperture will allow for less light, meaning you need to use a slower shutter speed.
Changing the aperture is known as “stopping.” Stopping up is opening the aperture from a smaller hole to a larger one, i.e. f/11 — f/5.6. Stopping down is the opposite, f/5.6 down to f/11.

Aperture can significantly change many of the visual elements in your photo beyond just exposure, such as depth of field or DOF. DOF, also known as focus, determines what parts of your photo are in focus, and what are out of focus. On a subject that is very close, you may want to use a narrow aperture to get everything in focus for a deep DOF. If you want the subject to be the main focal point and leave everything else blurry, you’ll want to use a wider aperture. Such as seen in the images below.

However, this blurry DOF effect generally only happens when you begin shooting photos close to a subject. An aperture of f/1.8 in a landscape won’t make any noticeable differences from f/8, but an aperture of f/1.8 on a subject just a few feet from you will create a blurry DOF, that f/8 would not. Both photos below were taken with an aperture of f/1.8. But as you can see, the farther the subject from the camera, the less DOF effects you’ll see.

A shallow aperture will also create something called “Bokeh,” which is when lights or brightly lit pieces of the photo become large, fuzzy circles, as seen in the pictures below.

Experimenting with different apertures is the best way to get to know which is suitable for the effect you’re looking for, and you’ll soon memorize them naturally.
ISO
ISO, which was originally known as “film speed,” is a setting that will essentially brighten or darken a photo. As you increase your ISO number, your photos will get brighter. Higher ISOs will help you capture images in darker environments, or help you work with the options of aperture and shutter speed. For example, if you’re taking a photo of a fast moving object in a dark environment, increasing your ISO will allow you to use a faster shutter speed.
Doubling ISO numbers will double the brightness of your photo. A photo taken at an ISO of 800 will be twice as bright as a photo taken at an ISO of 400. The photo on the left was taken with an ISO of 200, while the photo on the right was taken with an ISO of 400.

However, raising your ISO also has consequences. Increasing the ISO will create grain and noise in your picture, so brightening your photos with ISO can become frustrating. It also depends on what type of camera you’re using, whether it’s a crop sensor or a full frame (something I will discuss when we get to lenses). Full frame cameras have the ability to use higher ISO speeds while showing less noise. But generally speaking, the lower the ISO, the sharper the image.
The image below on the left was taken with an ISO of 200, while the image on the right was taken with an ISO of 1,000. Shutter speeds were also adjusted to ensure the brightness remained the same.

Getting Started
Now that you know the basic three principles of what makes up a photo, that chart on the intro page might start making a little more sense, and a little farther down you’ll see it again, but simplified. The best way to get these variables to come to mind naturally are to start with different camera modes. There are five main shooting modes.
The first is full-auto, which sets everything for you. It’s not a bad idea to start with auto, then download a free EXIF reader app, or use a website that allows you to upload a photo and read the data, to see how the camera created each photo.
EXIF data is information the camera records into the photo’s file. Viewing this data will tell you every little detail and setting the camera used to create the photo. Among them are aperture, exposure, and ISO. Below is a screenshot of some EXIF data.

The next mode is Aperture Priority, which allows you to set the aperture yourself, and the camera decides the exposure and ISO for you. I highly recommend beginning with aperture-priority mode. Because aperture is arguably the most influential of the three variables, from DOF to bokeh, it’s best to first learn to set this yourself, and see how the camera deals with the rest.
Shutter Priority mode allows you to set the exposure yourself, and the camera decides the aperture and ISO for you. This is great for experimenting with nighttime and long-exposure motion shots.
Program mode allows you to set the ISO yourself, and the camera determines which aperture and shutter speed to use. This is good for ensuring your ISO doesn’t go too high and create grain and noise.
The last is Manual mode, where you set all three variables yourself. Once you’ve experimented with each of the above and have a feel for how each variable affects photos differently, you can get into full manual and setting each of the three on your own, for fully customized photos.
Now that we’ve covered the basics and camera modes, below is that triangle from the first page, in a little more readable fashion.

Moving to the next image below, on the bottom left is a box that resembles what your LCD screen might look like on your camera. Every camera’s screen is set up slightly differently, but all have these values. Don’t get too bogged down by all the different boxes, just focus on the 5 that are highlighted. The image on the right also shows these same values as seen through the viewfinder.

I’d like to point out the green box, “exposure compensation.” That essentially acts like a light meter. After you set your three variables, the square circled in red will move back and forth as you alter them, informing you if the photo will come out too dark or too light, based on the settings you’ve chosen. It acts as a guide to help you with setting those variables.
You generally want that square to be as close to 0 as possible. To the right is overexposure, to the left is underexposure. Either increasing your shutter speed, reducing your ISO, or stopping down to a smaller aperture will all make it move towards the left, and the opposite for the right.
Lenses
We’ve covered the basics of how to take a photo, now let’s talk about the glassware—and the first thing you need to know is focal length.
Focal Length
Also known as focal distance or focal range, this is measured in millimeters (mm), and tells us how much of the image will be magnified. Think of it as a set of binoculars or a magnifying glass. The longer the focal length, the higher the magnification. The shorter the focal length, the lower the magnification.

There are two types of lenses for focal length: Prime lenses and Zoom lenses. Prime lenses have a fixed focal length, meaning they only shoot at a single distance (such as 35mm). Zoom lenses on the other hand, allow you to zoom in and out between focal lengths. The range of zoom lenses is enormous, some will only go between a few distances (18mm — 55mm) and others will have a very large range, called “super zoom,” which have an enormous focal range (50mm — 300mm).
There are also two types of lenses when it comes to aperture, which are Fixed Aperture and Variable Aperture. Fixed aperture lenses only have one f/stop, such as a 24–70mm f/2.8. Whether you’re at 24mm or 70mm, the aperture will always be f/2.8 — no more, no less. These lenses tend to have a limited focal range and can be pricey — but they’re worth their weight. Here’s a slice of that chart again to help visualize as I continue talking about these—numbers can get confusing.

Variable aperture lenses change in aperture, and zoom lenses of these types forcefully change as you zoom in. A 24–85mm f/3.5–4.5 lens means that at 24mm, it has a maximum wide aperture of f/3.5. At 85mm, the widest the aperture can get is f/4.5. Beyond that, variable aperture lenses allow you to stop down further, most down to around f/22 or even f/32.
Now that we’ve talked about focal distance, we can break down types of lenses based on that.
Ultra Wide Angle Lens
At the extreme end of the spectrum, an ultra-wide angle means it has a focal distance of 24mm or below, (14mm on a crop sensor). There are two types of ultra-wide lenses. Fisheye and Rectilinear. Fisheye lenses, also called curvilinear, have an extremely wide angle of view, which produces a “bubble” effect, as seen below. These photos were taken with an 8mm fisheye.

Rectilinear lenses on the other hand, are designed to make straight lines appear straight, despite the distortion an extremely short focal length would normally cause. They correct the curvilinear distortion while still allowing for a wide range of the scene to be captured in the photo.

Wide Angle/Standard Lens
A normal wide angle lens has a focal distance between 25mm and 100mm. They’re used for, well, just about everything. They make up the bulk of your standard lenses. Both of the images below were taken at 55mm on a standard zoom lens.

Telephoto Lens
Telephoto lenses have a focal length generally above 100mm. For example,100mm, 250mm, 500mm are all telephoto lenses. They’re great for capturing subjects far away.
In the images below, the side of the building on the left was taken at 130mm. The spray paint cans on the right were shot at 300mm.

Macro Lens
Be careful not to mistake a telephoto lens for a macro lens when picking one out. Macro lenses tend to be in the telephoto range (such as 100mm), but are built to focus on an extremely small subject with a high and sharp quality. Just because a lens is 100mm doesn’t mean it’s built for macro capability. A 200mm telephoto can be used for macro photography, but not with the clarity and precision of a macro lens. Macros can be used as telephotos, but with a loss of sharpness. Macros are built to focus on reproducing the size of subject of at least 1:1 or larger, meaning the size of the object in the photo is reflected as the exact same size, or larger, on the image sensor.

Tilt-Shift Lens
These aren’t too common, and are generally used for architectural photography and gimmicky-style shots. Normally, a traditional camera lens captures a circular image, projected onto a rectangular sensor, rendering a rectangular photo. In normal lenses, that imaging circle is fixed in relation to the camera sensor’s position.
Tilt-shift lenses allow you to change the position of that imaging circle by literally tilting the lens. They can straighten lines that appear to converge in the distance, or they can create an interesting DOF that makes a landscape scene look like it was taken with a macro lens, giving it a miniature illusion. Below, the image on the left shows how it works great for straightening distant lines in architecture photography, while the image on the right shows how it can add a DOF to a landscape to make it look miniature. There are also some tilt-shift adapters that allow you to convert old and obscure lenses into tilt-shift ones.

White Balance
Now that we’ve covered the basics and lenses, there’s another little feature that digital cameras allow us to use to customize the look and tone of our image even more, and that’s White Balance.
Our eyes and brain compensate for different kinds of light, which is why a to the human eye, a white object appears white, regardless of the lighting conditions. However, digital cameras need some help to imitate that effect for different kinds of light. Artificial lighting can throw off a camera’s settings, or you can intentionally change them for creative effects.
A camera’s auto-white balance can generally read the color temperature of a scene and determine the correct white balance setting, or you can select from one of the preset settings if auto just isn’t cutting it. White balance is measured on the Kelvin temperature scale, as seen below.

A more precise way to set the white balance is to use the PRE setting, known as “white card.” Under this setting, you hold a white-colored card in front of the camera lens and press the shutter button. The camera will read and lock the color temperature of the light reflected from that card, setting the correct temperature.
Or, you can do-it-yourself with the Kelvin temperature scale, setting the white balance in degrees of Kelvin. This option isn’t always available on less expensive, entry-level DSLRs, although you can still set this by using the PRE setting and taking a picture of a colored card (such as green or blue) to come up with different white-balance color skews.
Scrolling down, you’ll find some photos taken with a normal white balance setting, and with a custom white balance setting. As you can see, setting a custom white balance can help you create your own mood for a picture, from pleasant and friendly warm tones, to eerie and spooky cold tones, or anything in between.


Tips & Tricks
Daytime Outdoor:
For general daytime outdoor shots like urban scenery and landscapes, an aperture range of f/8 to f/16 is a good starting point, as it’s generally accepted that the narrower the aperture, the sharper the image.
Nighttime and Low Light
It’s a pretty good idea to get a tripod, as the most crucial variable in nighttime shots is often shutter speed. In order to allow more light to enter the lens, when you’re set on using a particular aperture and a low ISO, keeping the camera steady is crucial. It’s also not a bad idea to get a remote or use the camera’s timer, because the simple act of pressing the shutter button on the camera can create a minimal shake that ends up adding blur to your photos.

Moving Subjects
These can be tricky. It’s not always the best idea to set the fastest possible shutter speed, or moving objects will look completely frozen, which isn’t always the desired effect. As you can see in the images below, on the left it appears that the cars aren’t even moving. The photo on the right
was achieved by using a slightly slower shutter speed, and following the car with the lens while taking photos. Panning the lens while shooting at a slightly slower shutter speed creates an image where the background is blurred in motion, but the subject is frozen in time, showing action and movement.

Depth of Field With Telephoto Lenses
Using a short focal range and wide aperture aren’t the only ways to get a beautiful DOF. Telephoto lenses can also achieve this effect, as seen in the images below. Both photos were shot at a focal distance of 300mm and an aperture of f/5.6. But by using a telephoto, we get the same shallow DOF effect as if it was shot using a 50mm lens at f/1.8. Many portrait photographers use large focal distances for this very reason; taking a portrait from 85–100mm allows you to flatten faces while blurring the background.

Backlighting
For most situations, you generally want the source of light to be behind you, casting light onto the subject. But backlighting is a method where the light is aimed towards the camera, behind the subject. It creates a silhouette with a beautifully sharp outline.

Bokeh
There’s several ways to get bokeh in your shots. In the images below, the portrait on the left created bokeh by the small bits of light shining through the trees in the background. The middle photo used streetlights in the distance. The photo of the fruits on the right used a shiny reflective wreath a few feet behind the subject that reflected bits of light towards the camera, creating bokeh with the shallow DOF.

Landscapes With Fisheyes
A lot of people consider fisheye lenses to be a gimmick, but with a fisheye that fills the entire sensor, you can get incredible landscape shots. The two images below were achieved by ensuring that the subject in the landscape was in the very center of the photo, and the horizon was exactly in the middle. This makes the warping effect minimal, while making the clouds look as if they’re rolling towards you in the left, and exposing a much wider area of the landscape on the right. Both wouldn’t have been achievable with a normal lens.

Additional Gear
If you’re interested in getting a little more creative with your photography on a budget, there’s a handful of cool little gizmos you can pick up for a few bucks. Let’s start with filters.
UV Filters
The first and most common is a UV filter. Aside from the obvious of filtering UV light, they act as a protective shield, keeping your lens from coming into contact with dust, dirt, or scratches. They can also help to boost contrast on overcast days, or shooting when shadows are present.
Polarizing Filters
These are essentially like polarized sunglasses — they add depth to an image by saturating colors and reducing reflections. They’re terrific for shooting landscapes, because they darken skies and make colors pop, eliminate glare, and reduce reflections on watery or glassy surfaces.

Neutral Density (ND) Filters
These filters essentially reduce the amount of light that enters the lens and onto the camera’s sensor. They’re useful for taking long exposures in bright light situations. ND filters are great for smoothing water movement in rivers and waterfalls, achieving a shallow DOF in bright light, making moving objects less visible or completely invisible (such as cars and people), and creating a blur to convey motion with moving subjects.

Infrared (IR) Filters
IR filters allow only infrared light to reach your camera’s sensor, while filtering out the visible light. They are generally only used for two purposes — infrared photography (which is pretty much only do-able for Black and White photography when using a normal camera), and for converting a Full Spectrum converted sensor to IR conversion (don’t worry about that, super technical stuff for specialized cameras). IR filters are fun for getting wildly different looking photos when shooting in monochrome. The most noticeable effect many go for is that foliage that’s usually green comes out in bright white hues, and clear blue skies often turn dark and shadowy. However, IR filters are dark and require focusing before attaching the filter, and using very long exposure times. In order to achieve colorized IR photos, you need to convert your camera’s sensor to an IR sensor, which is a pricey process for more experienced photographers. But using an IR filter for monochrome on a normal camera is a great introduction to IR photography.

Close-up filters
Close-up filters allow you to convert nearly any lens into a macro lens, within reason. They’re essentially just a magnifying glass that you screw onto the lens. They don’t actually filter anything, they just alter the light as it enters your lens, the same way a magnifying glass does. They’re inexpensive and great for getting started with macro photography. The math is a bit complicated, but generally, the higher the number, (from say, +2 to +10, and so on), the closer your lens will be able to focus.

There’s also several “special effects” filters which allow you to create effects such as multi-point stars and sparkles with lights, change and customize the shapes of your bokeh blobs, and soften and diffuse photo edges while maintaining a sharp center for a dream-like visual effect.
But since we’re done with filters and on the topic of macro, there’s two other devices you can use to convert a lens into a macro lens. The first is:
Macro Extension Tubes
As I mentioned before, every lens has a minimum focusing distance. That minimum distance can become an issue with macro photography, because you can’t get close enough to shoot tiny subjects with a lens that won’t focus that close. One way around this is a macro extension tube. These are just metal tubes that you attach between the camera body and the lens. They shift the focus of the lens, allowing you to get closer to subjects for macro shots. You can stack multiple rings on these lenses for closer and closer macro shots.
Macro extension tubes are inexpensive. An autofocus-enabled one ranges from $20 to $50 online. Below are two shots taken with a macro extension tube and a 50mm f/1.8 lens.

Lens Reversing Rings
A reversing ring is another method of converting a lens for macro photography. It’s a simple ring that allows you to put your lens on the camera backwards, reversing the optics of the lens so it can be used to shoot photos at extremely close distances. Be careful though, doing this exposes the underside of the lens to the outside world, so be sure you clean that side of the lens before putting it back on your camera the right way, or you could end up getting dirt on the camera sensor.
There can be a lot of math involved in figuring out what exactly your magnification is when using a lens-reversing ring, but it’s not really that important for starting out, you learn by trial and error. One thing to remember is the shorter the focal length, the larger the magnification. As I mentioned before, a macro lens gives you a 1:1 ratio, meaning the subject you’re photographing is the exact same size on the sensor as it is in real life. A 50mm lens on a lens-reversing ring will give you a 1:1 ratio, but a shorter focal length, such as a 28mm, will give you a 3:1 magnification, meaning the subject is 3 times larger on the sensor than it is in real life.
Below are two photos shot using a 28mm lens on a lens-reversing ring and some extension tubes.

Teleconverters
A teleconverter is essentially a magnifying glass used between a camera body and lens. They can be used to increase focal length, but with a tradeoff of some overall sharpness and aperture. Every 1x of magnification will lose one aperture stop of light.
Note that some lenses cannot be used with a teleconverter, such as a wide angle or wide angle-zoom lens, as well as some with slower apertures than f/2.8. You can find which lenses are compatible through Google or your lens manual. Below are two photos taken with a 2x teleconverter.

Conclusion
So there you have it. I could go on and on about composition, rule of thirds, angles, reading histograms, etc. But for right now, just get out there and take some photos. If you find it exciting and delightful, there are tons of tutorials, blogs, and videos out there that delve into each and every little nook and cranny of cameras and photography.
But this guide was meant to be short and sweet. So yeah… the end. Have fun!
P.S. Stay tuned for my guide on Flash! And if you’re interested in checking out my work, go to: www.MikeShaheen.com
Here’s some more of my work